3D Primer
Everything we have done so far has been in two dimensions, using (x, y) for position, and [width, height] for size. Now that we’ve got data that also has depth, we can move into the third dimension to represent it. This means using (x, y, z) for position, and [width, height, depth] for size.
3D in OF
By default, the openFrameworks canvas is set to 2D. The origin (0, 0) is in the top-left, and values increase as we move right and down. In 3D, the origin (0, 0, 0) is in the middle of the window. We can move in both directions in any of the three dimensions (up, down, left, right, forward, back), meaning that we can have positive and negative values for positions.
Note that in 3D, the Y direction is the opposite than in 2D; Y increases as we move up. This is common with most 3D software.
The Z direction, however, can follow one of two coordinate system conventions:
- A right-handed coordinate system means the z-axis points forward. Z decreases as we move further away.
- A left-handed coordinate system means the z-axis points backwards. Z increases as we move further away.
openFrameworks follows the OpenGL convention and has a right-handed coordinate system.

Cameras
The simplest way to switch to 3D space is to use an ofCamera.
ofCamerahasbegin()andend()functions; anything we put in between those will be drawn in 3D space.- The camera needs to be positioned somewhere in space. We use
setPosition()to place it.
// ofApp.h
#pragma once

#include "ofMain.h"

#include "ofxGui.h"

class ofApp : public ofBaseApp
{
public:
  void setup();
  void update();
  void draw();

  ofVideoGrabber grabber;

  ofCamera cam;

  ofParameter<glm::vec3> camPosition;

  ofParameter<bool> useCamera;

  ofxPanel guiPanel;
};
// ofApp.cpp
#include "ofApp.h"

void ofApp::setup()
{
  ofSetWindowShape(640, 480);

  grabber.setup(640, 480);

  // Setup the parameters.
  useCamera.set("Use Camera", false);
  camPosition.set("Cam Position", glm::vec3(0, 0, 90), glm::vec3(-100), glm::vec3(100));

  // Setup the gui.
  guiPanel.setup("3D World", "settings.json");
  guiPanel.add(useCamera);
  guiPanel.add(camPosition);
}

void ofApp::update()
{
  grabber.update();

  cam.setPosition(camPosition);
}

void ofApp::draw()
{
  if (useCamera)
  {
    // Begin rendering through the camera.
    cam.begin();

    // Scale the drawing down into more manageable units.
    ofScale(0.1f);
    // Draw the grabber image anchored in the center.
    grabber.draw(-grabber.getWidth() / 2, -grabber.getHeight() / 2);

    cam.end();
    // Done rendering through the camera.
  }
  else
  {
    // Draw the grabber in 2D.
    grabber.draw(0, 0);
  }

  // Draw the gui.
  guiPanel.draw();
}
Note the use of glm::vec3 for the camera position attribute. glm is the mathematics library used by default in OF. Here we are using the glm::vec3 type which is a 3D point (with x, y, z coordinates).
- Alternatively to
setPosition(), there are also functions fortruck(),boom()(aka pedestal), anddolly()to move in the XYZ axes. - A camera can be oriented anywhere in space as well. We can set its orientation with
setOrientation(). - There are also functions for
panDeg(),tiltDeg()(aka pedestal), androllDeg()to rotate in the XYZ axes.

- It is sometimes more useful to tell a camera where to “look” rather than how to orient itself. This is done with
lookAt()which takes a target position as an argument. The camera will figure out automatically what orientation to use to look at that target.
The following example demonstrates the effect of these different functions on the ofCamera.
// ofApp.h
#pragma once

#include "ofMain.h"

#include "ofxGui.h"

class ofApp : public ofBaseApp
{
public:
  void setup();
  void update();
  void draw();

  ofVideoGrabber grabber;

  ofCamera cam;

  ofParameter<glm::vec3> camPosition;
  ofParameter<float> camTruck;
  ofParameter<float> camBoom;
  ofParameter<float> camDolly;
  ofParameter<bool> orientCamera;
  ofParameter<glm::vec3> camLookAt;
  ofParameter<float> camPan;
  ofParameter<float> camTilt;
  ofParameter<float> camRoll;

  ofParameter<bool> useCamera;

  ofxPanel guiPanel;
};
// ofApp.cpp
#include "ofApp.h"

void ofApp::setup()
{
  ofSetWindowShape(640, 480);

  grabber.setup(640, 480);

  // Setup the parameters.
  useCamera.set("Use Camera", false);
  camPosition.set("Cam Position", glm::vec3(0, 0, 90), glm::vec3(-100), glm::vec3(100));
  camTruck.set("Truck", 0.0f, -100.0f, 100.0f);
  camBoom.set("Boom", 0.0f, -100.0f, 100.0f);
  camDolly.set("Dolly", 0.0f, -100.0f, 100.0f);
  orientCamera.set("Orient Camera", true);
  camLookAt.set("Cam Look At", ofDefaultVec3(0, 0, 0), ofDefaultVec3(-100), ofDefaultVec3(100));
  camPan.set("Pan", 0.0f, -90.0f, 90.0f);
  camTilt.set("Tilt", 0.0f, -90.0f, 90.0f);
  camRoll.set("Roll", 0.0f, -90.0f, 90.0f);

  // Setup the gui.
  guiPanel.setup("3D World", "settings.json");
  guiPanel.add(useCamera);
  guiPanel.add(camPosition);
  guiPanel.add(camTruck);
  guiPanel.add(camBoom);
  guiPanel.add(camDolly);
  guiPanel.add(orientCamera);
  guiPanel.add(camLookAt);
  guiPanel.add(camPan);
  guiPanel.add(camTilt);
  guiPanel.add(camRoll);
}

void ofApp::update()
{
  grabber.update();

  // Reset everything each frame, otherwise the transform will be additive.
  cam.resetTransform();

  cam.setPosition(camPosition);
  cam.truck(camTruck);
  cam.boom(camBoom);
  cam.dolly(camDolly);

  if (orientCamera)
  {
    cam.lookAt(camLookAt);
    cam.panDeg(camPan);
    cam.tiltDeg(camTilt);
    cam.rollDeg(camRoll);
  }
}

void ofApp::draw()
{
  if (useCamera)
  {
    // Begin rendering through the camera.
    cam.begin();

    // Scale the drawing down into more manageable units.
    ofScale(0.1f);
    // Draw the grabber image anchored in the center.
    grabber.draw(-grabber.getWidth() / 2, -grabber.getHeight() / 2);

    cam.end();
    // Done rendering through the camera.
  }
  else
  {
    // Draw the grabber in 2D.
    grabber.draw(0, 0);
  }

  // Draw the gui.
  guiPanel.draw();
}
Controlling an ofCamera using sliders is not always intuitive. As an alternative, OF provides ofEasyCam . ofEasyCam is an ofCamera that is controlled using the mouse, and makes navigating the scene extremely easy. If you have every used 3D software like Maya or played FPS video games, controlling the camera should feel familiar.
// ofApp.h
#pragma once

#include "ofMain.h"

#include "ofxGui.h"

class ofApp : public ofBaseApp
{
public:
  void setup();
  void update();
  void draw();

  ofVideoGrabber grabber;

  ofEasyCam cam;

  ofParameter<bool> useCamera;

  ofxPanel guiPanel;
};
// ofApp.cpp
#include "ofApp.h"

void ofApp::setup()
{
  ofSetWindowShape(640, 480);

  grabber.setup(640, 480);

  // Setup the parameters.
  useCamera.set("Use Camera", false);

  // Setup the gui.
  guiPanel.setup("3D World", "settings.json");
  guiPanel.add(useCamera);
}

void ofApp::update()
{
  grabber.update();
}

void ofApp::draw()
{
  if (useCamera)
  {
    // Begin rendering through the camera.
    cam.begin();

    // Scale the drawing down into more manageable units.
    ofScale(0.1f);
    // Draw the grabber image anchored in the center.
    grabber.draw(-grabber.getWidth() / 2, -grabber.getHeight() / 2);

    cam.end();
    // Done rendering through the camera.
  }
  else
  {
    // Draw the grabber in 2D.
    grabber.draw(0, 0);
  }

  // Draw the gui.
  guiPanel.draw();
}
Meshes
Everything that is drawn on screen is geometry.
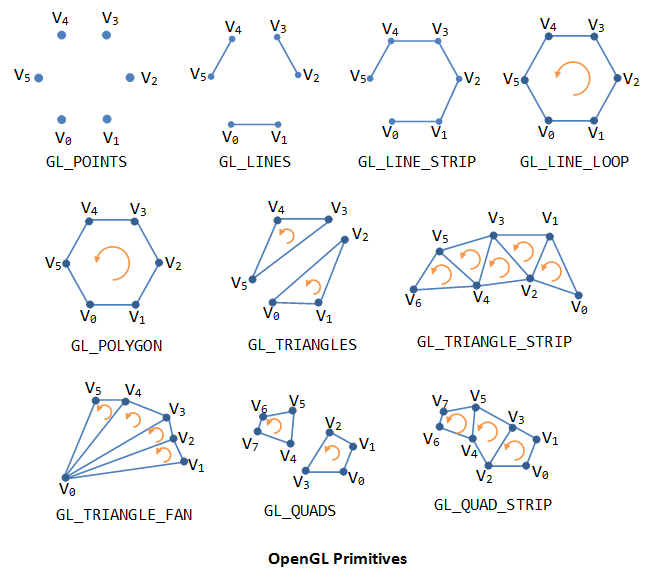
- The geometry has a topology, which is what the geometry is made up of. This is usually points, lines, or triangles. These can have different arrangements, as seen in the diagram below.
- The topology is made up of vertices. These are points with specific parameters. A simple vertex will just have a position. A more complex vertex can also have a color, a normal, texture coordinates, etc.
- The topology and vertex data together make up a mesh. A mesh is like a series of commands that tell the application how to draw the geometry to the screen.
In openFrameworks, we use ofMesh as the geometry container. This is what is used to draw meshes to the screen.

Every time we have been drawing images, we’ve actually been drawing two triangles in the shape of a rectangle.
// ofApp.h
#pragma once

#include "ofMain.h"

#include "ofxGui.h"

class ofApp : public ofBaseApp
{
public:
  void setup();
  void draw();

  ofMesh quadMesh;

  ofParameter<bool> drawWireframe;

  ofxPanel guiPanel;
};
// ofApp.cpp
#include "ofApp.h"

void ofApp::setup()
{
  // Build the quad mesh.
  quadMesh.setMode(OF_PRIMITIVE_TRIANGLES);

  quadMesh.addVertex(glm::vec3(0, 0, 0));
  quadMesh.addVertex(glm::vec3(640, 0, 0));
  quadMesh.addVertex(glm::vec3(640, 480, 0));
  quadMesh.addVertex(glm::vec3(0, 0, 0));
  quadMesh.addVertex(glm::vec3(640, 480, 0));
  quadMesh.addVertex(glm::vec3(0, 480, 0));

  // Setup the parameters.
  drawWireframe.set("Wireframe?", false);

  // Setup the gui.
  guiPanel.setup("3D World", "settings.json");
  guiPanel.add(drawWireframe);
}

void ofApp::draw()
{
  // Render the mesh.
  if (drawWireframe)
  {
    quadMesh.drawWireframe();
  }
  else
  {
    quadMesh.draw();
  }

  // Draw the gui.
  guiPanel.draw();
}

If we assign each vertex a color, we can see how that gets rendered across the geometry.
Use ofMesh::addColor() to add a color attribute to each vertex in our quad mesh.
// ofApp.cpp
#include "ofApp.h"

void ofApp::setup()
{
  // Build the quad mesh.
  quadMesh.setMode(OF_PRIMITIVE_TRIANGLES);

  quadMesh.addVertex(glm::vec3(0, 0, 0));
  quadMesh.addVertex(glm::vec3(640, 0, 0));
  quadMesh.addVertex(glm::vec3(640, 480, 0));
  quadMesh.addVertex(glm::vec3(0, 0, 0));
  quadMesh.addVertex(glm::vec3(640, 480, 0));
  quadMesh.addVertex(glm::vec3(0, 480, 0));

  quadMesh.addColor(ofColor(200, 0, 0));
  quadMesh.addColor(ofColor(0, 200, 0));
  quadMesh.addColor(ofColor(0, 0, 200));
  quadMesh.addColor(ofColor(200, 0, 0));
  quadMesh.addColor(ofColor(0, 0, 200));
  quadMesh.addColor(ofColor(200, 200, 0));

  // Setup the parameters.
  drawWireframe.set("Wireframe?", false);

  // Setup the gui.
  guiPanel.setup("3D World", "settings.json");
  guiPanel.add(drawWireframe);
}

void ofApp::draw()
{
  // Render the mesh.
  if (drawWireframe)
  {
    quadMesh.drawWireframe();
  }
  else
  {
    quadMesh.draw();
  }

  // Draw the gui.
  guiPanel.draw();
}
Even though we only have four vertices and four colors, the entire window has color across it. When using topology OF_PRIMITIVE_TRIANGLES, the entire shape of the triangle is filled in, so the renderer calculates the color for each pixel on screen by mixing the vertex colors together. This is called interpolation.

Interpolation doesn’t just work with colors, but with all vertex parameters. This is why when we use two points to draw a line, the entire length of the line gets drawn and not just the two end points.
Let’s replace the colors per vertex by texture coordinates. Instead of setting the color explicitly, this tells the renderer to pick the color from a texture we assign to it.
- This is called texture binding.
- Texture coordinates are 2D, so we will use
glm::vec2to define them. - All objects in OF that render to the screen have
bind()/unbind()methods which are used for this! - This includes
ofImage,ofVideoGrabber, and basically anything that contains anofTexture.
// ofApp.h
#pragma once

#include "ofMain.h"

#include "ofxGui.h"

class ofApp : public ofBaseApp
{
public:
  void setup();
  void update();
  void draw();

  ofVideoGrabber grabber;

  ofMesh quadMesh;

  ofParameter<bool> drawWireframe;

  ofxPanel guiPanel;
};
// ofApp.cpp
#include "ofApp.h"

void ofApp::setup()
{
  ofSetWindowShape(640, 480);

  // Start the grabber.
  grabber.setup(640, 480);

  // Build the quad mesh.
  quadMesh.setMode(OF_PRIMITIVE_TRIANGLES);

  quadMesh.addVertex(glm::vec3(0, 0, 0));
  quadMesh.addVertex(glm::vec3(640, 0, 0));
  quadMesh.addVertex(glm::vec3(640, 480, 0));
  quadMesh.addVertex(glm::vec3(0, 0, 0));
  quadMesh.addVertex(glm::vec3(640, 480, 0));
  quadMesh.addVertex(glm::vec3(0, 480, 0));

  quadMesh.addTexCoord(glm::vec2(0, 0));
  quadMesh.addTexCoord(glm::vec2(640, 0));
  quadMesh.addTexCoord(glm::vec2(640, 480));
  quadMesh.addTexCoord(glm::vec2(0, 0));
  quadMesh.addTexCoord(glm::vec2(640, 480));
  quadMesh.addTexCoord(glm::vec2(0, 480));

  // Setup the parameters.
  drawWireframe.set("Wireframe?", false);

  // Setup the gui.
  guiPanel.setup("3D World", "settings.json");
  guiPanel.add(drawWireframe);
}

void ofApp::update()
{
  grabber.update();
}

void ofApp::draw()
{
  // Render the mesh.
  grabber.bind();
  if (drawWireframe)
  {
      quadMesh.drawWireframe();
  }
  else
  {
      quadMesh.draw();
  }
  grabber.unbind();

  // Draw the gui.
  guiPanel.draw();
}
The last example does essentially what ofVideoGrabber.draw() does:
- Generate a mesh with vertex positions and texture coordinates.
- Bind the texture provided by the video grabber.
- Draw the mesh to the screen using the bound texture to set the pixel colors.