Intro to OpenCV
OpenCV is an open-source library for performing computer vision operations.
- OpenCV was originally released in 2000 and has gone through many updates and revisions since then.
- The library is cross-platform and available for all major platforms. It includes interfaces in C++, Python, Java, and JavaScript.
- OpenCV includes hundreds of algorithms, for performing a variety of tasks like image conversion, object tracking, feature recognition, camera calibration, etc.
OpenCV uses its own image type, called cv::Mat. The word “Mat” is short for matrix, which is what we call a multi-dimensional array of values in mathematics.
cv::Mat is similar to ofPixels, as it holds an array of pixel values, but it is also much more powerful as it can perform all types of operations on matrices. For example, we can add or multiply two cv::Mat objects directly, without needing to loop through the pixels one at a time.
What does the :: mean in this context?
We have already covered that :: is a scope resolution operator in C++. We first encountered :: to show the relationship between methods and classes, for example ofApp::setup() means that the method setup() is part of ofApp.
In the case of cv::Mat, the :: is used to show the relationship between classes and namespaces.
A namespace is a group that holds classes that are related to each other. This is similar to how programs are organized using packages in JavaScript, Java, or Python. In this case, cv::Mat is a reference to the Mat class that belongs to the cv namespace.
Classes in the same namespace can refer to each other directly, but classes outside of that namespace need to specify the namespace using the :: notation to refer to its classes.
Most classes in OF do not belong to a namespace, which is why we have not seen this yet, but this is gradually changing. New additions to the framework, like the glm math library are keeping their namespace visible, so we will encounter types like glm::vec2 and glm::vec3 when manipulating vectors.
OpenCV for openFrameworks
While you can use the OpenCV library directly in OF (since both are written in C++), this would require image type conversions every time we need to move data from one framework to the other. For example, to convert our background subtraction algorithm we would:
- Capture a frame from the camera in “OF space”, using
ofVideoGrabberandofPixels. - Convert the
ofPixelsto acv::Matto use the pixels in “OpenCV space”. - Perform the background subtraction using OpenCV functions.
- Convert the result
cv::Matback to anofImageto draw it to the screen.
This would also apply to other types which we might use. For example:
- Points (
cv::Pointvsglm::vec2) - Rectangles (
cv::RectvsofRectangle)
We will use an openFrameworks addon to interface with OpenCV. This will take care of handling these conversions and give us additional OF-specific methods we can use.
There are two options for addons:
ofxOpenCvis the built-in OpenCV addon. This wrapper hides most of the native OpenCV structures and methods and allows us to work strictly in “OF space”. While this simplifies our work, we are limited by the data types and algorithms that are included in the addon.ofxCvis a user-contributed addon that takes a more transparent approach. Interchange between OF and CV is facilitated with helper functions, but the majority of the work is done using native OpenCV calls. While this may seem more complicated, it reduces our dependency to OF as we are learning how to use OpenCV directly.
We will use ofxCv for this class. As it is a user-contributed addon, we will need to download it and unzip it in the OF addons directory at /path/to/OF/addons/. Once that is done, the Project Generator will automatically (after a restart) detect the addon and allow us to include it in our projects.
ofxCv uses the OpenCV files from ofxOpenCv, so make sure to include both addons in your projects.

Background Subtraction
Let’s write a new background subtraction example using OpenCV. We will focus on pixel brightness for our operations, so we will convert our images from RGB color to grayscale before processing.
// ofApp.h
#pragma once

#include "ofMain.h"
#include "ofxCv.h"
#include "ofxGui.h"

class ofApp : public ofBaseApp
{
public:
  void setup();
  void update();
  void draw();

  ofVideoGrabber grabber;
  ofImage backgroundImg;
  ofImage resultImg;

  ofParameter<bool> captureBackground;
  ofParameter<int> briThreshold;

  ofxPanel guiPanel;
};
// ofApp.cpp
#include "ofApp.h"

void ofApp::setup()
{
  grabber.setup(1280, 720);

  captureBackground.set("Capture BG", true);
  briThreshold.set("Bri Thresh", 120, 0, 255);

  guiPanel.setup("BG Subtraction");
  guiPanel.add(captureBackground);
  guiPanel.add(briThreshold);
}

void ofApp::update()
{
  grabber.update();

  ofImage grabberColorImg;
  grabberColorImg.setFromPixels(grabber.getPixels());

  // Convert input image to grayscale.
  ofImage grabberGrayImg;
  ofxCv::copyGray(grabberColorImg, grabberGrayImg);

  if (captureBackground)
  {
      // Copy input image to background.
      backgroundImg = grabberGrayImg;
      captureBackground = false;
  }

  // Compute the difference image between the background and grabber.
  ofxCv::absdiff(backgroundImg, grabberGrayImg, resultImg);
  // Threshold the difference image.
  ofxCv::threshold(resultImg, briThreshold);
  // Update the image to draw it.
  resultImg.update();
}

void ofApp::draw()
{
  resultImg.draw(0, 0, ofGetWidth(), ofGetHeight());

  guiPanel.draw();
}
Note the use of the ofxCv::absdiff() and ofxCv::threshold() functions for processing all our pixels in a single line of code. These are wrappers for cv::absdiff() and cv::threshold() allowing us to use ofImage objects in “OpenCV” space. ofxCv handles all the necessary conversions behind the scenes.
We could also skip some of the conversions between “OF space” and “OpenCV” space to optimize our code. This can be useful for more complex apps that need better performance. Let’s rewrite the previous example using cv objects for our CV operations, i.e. replace ofImage with cv::Mat.
We will also make two additional optimizations:
- Cache the variables used for grabber images so that they don’t get reallocated every frame. We do this by adding two new variables
grabberColorMatandgrabberGrayMatto theofAppclass. - Only run through our algorithm when a new video frame is captured. This is an important step as the video camera will usually run at much lower framerate than the application itself. This is achieved by checking
ofVideoGrabber.isFrameNew()before running through our CV code.
// ofApp.h
#pragma once

#include "ofMain.h"
#include "ofxCv.h"
#include "ofxGui.h"

class ofApp : public ofBaseApp
{
public:
  void setup();
  void update();
  void draw();

  ofVideoGrabber grabber;
  cv::Mat grabberColorMat;
  cv::Mat grabberGrayMat;
  cv::Mat backgroundMat;
  cv::Mat resultMat;
  ofImage resultImg;

  ofParameter<bool> captureBackground;
  ofParameter<int> briThreshold;

  ofxPanel guiPanel;
};
// ofApp.cpp
#include "ofApp.h"

void ofApp::setup()
{
  grabber.setup(1280, 720);

  captureBackground.set("Capture BG", true);
  briThreshold.set("Bri Thresh", 120, 0, 255);

  guiPanel.setup("BG Subtraction");
  guiPanel.add(captureBackground);
  guiPanel.add(briThreshold);
}

void ofApp::update()
{
  grabber.update();
  if (grabber.isFrameNew())
  {
    // Convert the grabber image to CV space.
    grabberColorMat = ofxCv::toCv(grabber.getPixels());

    // Convert input image to grayscale.
    ofxCv::copyGray(grabberColorMat, grabberGrayMat);

    if (captureBackground)
    {
      // Copy input image to background.
      // Note that the = operator copies cv::Mat by reference,
      // but we need an actual copy here. This is why we use
      // the cv::Mat.clone() method.
      backgroundMat = grabberGrayMat.clone();
      captureBackground = false;
    }

    // Compute the difference image between the background and grabber.
    cv::absdiff(backgroundMat, grabberGrayMat, resultMat);
    // Threshold the difference image.
    ofxCv::threshold(resultMat, briThreshold);

    // Convert the result CV image back to OF space.
    ofxCv::toOf(resultMat, resultImg);
    // Update the image to draw it.
    resultImg.update();
  }
}

void ofApp::draw()
{
  resultImg.draw(0, 0, ofGetWidth(), ofGetHeight());

  guiPanel.draw();
}
Face Detection
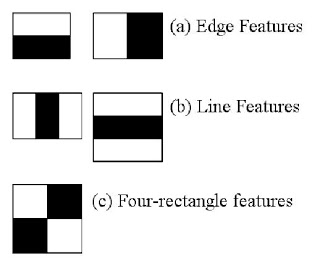
OpenCV includes a powerful object detection algorithm which is often used for finding faces in images, using something called Haar cascade classifiers.
This is a machine learning algorithm where a classifier is trained on many sample images, both positive (with faces) and negative (without faces). It uses this to generate a model, which it can then use to detect faces in new images by looking for similar patterns.
The features are in the shape of black and white patterns (Haar features), which are searched for in an image. If the patterns are arranged in a recognizable way, we have a match!

Let’s have a look at the face example that ships with ofxCv. Note that it does not come with the Haar cascade file, you’ll need to add it yourself to the OF/addons/ofxCv/example-face/bin/data/ folder. You can get the face file in the OF/examples/computer_vision/opencvHaarFinderExample/bin/data/ folder, or you can try some of the other ones from the OpenCV repository.
// ofApp.h
#pragma once

#include "ofMain.h"
#include "ofxCv.h"

class ofApp : public ofBaseApp
{
public:
  void setup();
  void update();
  void draw();

  ofVideoGrabber cam;
  ofxCv::ObjectFinder finder;
};
// ofApp.cpp
#include "ofApp.h"

using namespace ofxCv;
using namespace cv;

void ofApp::setup()
{
  ofSetVerticalSync(true);
  ofSetFrameRate(120);

  finder.setup("haarcascade_frontalface_default.xml");
  finder.setPreset(ObjectFinder::Fast);
  cam.setup(640, 480);
}

void ofApp::update()
{
  cam.update();
  if (cam.isFrameNew())
  {
      finder.update(cam);
  }
}

void ofApp::draw()
{
  cam.draw(0, 0);
  finder.draw();
  ofDrawBitmapStringHighlight(ofToString(finder.size()), 10, 20);
}
What does using namespace do?
A using directive can be used in C++ to indicate that classes and methods from the specified namespace will be used in the file.
When adding using namespace ofxCv; at the top of the file, we can use classes from ofxCv without having to prefix them with ofxCv::. This can be seen with ObjectFinder::Fast in the code above, which if fully defined is ofxCv::ObjectFinder::Fast.
Some people prefer using directives because it makes the code more concise. Others prefer being explicit and referring the namespace throughout. Both options are fine, it’s a matter of style.